
Our Indoor Seed Starting Set-Up & DIY Greenhouse Supplies
This post contains affiliate links. By clicking the link and making a purchase we receive a small commission at no additional cost to you! This helps us keep the lights on and continue to bring you great content.
*Updated for 2025!
Starting seeds has become a holiday in our household and a time of year that both Lucas and I look forward to each year. For years, we have been using a simple and small seed starting set-up with a pack-away greenhouse. This little set up worked perfectly for our small backyard garden for years, however, this year we decided to start even more seeds which warrants a larger set up.
First things first, however, in which we will explain why certain products are necessary in seed starting. You may know that you could throw seeds in a cup of dirt and set it on a sunny window sill and watch as seeds probably grow, but it’s different when you want to grow a number of seeds for weeks for your garden, and we will explain what we mean. In order to be successful in starting seeds indoors, you must emulate what Mother Nature provides outdoors. Light, warmth, and structure are the key components to a good seed starting set up and it’s tricky if you don’t know what products to look for. In this post (and video), we will show you how we built our indoor greenhouse using some simple items. In just a few hours you will have a greenhouse that even the most experienced gardeners would envy.
First, What do Seedlings Need?
light

Seeds don’t need much to germinate other than the correct soil temperature and moisture - though each variety of seed is different in their needs, most seeds like a soil temp between 65-75 degrees Fahrenheit. It is once seeds germinate that you will find the biggest hurdle in keeping them alive - light. Speaking in regards to vegetable seedlings, seedlings need a LOT of light to grow properly. A sign of not enough light is leggy, floppy seedlings that do not transplant well nor will produce great fruit. Leggy seedlings are often a new gardeners biggest foe in starting seeds.
So how much light do seedlings need? Well, in general, seedlings need between 14-16 hours of light a day and because a gardener typically starts seeds inside months before transplanting outside we have to use grow lights.
When choosing grow lights it is very important to select lights that replicate the sun - and spoiler alert, most lights that advertise as ‘grow lights’ do not always do this! We actually purchased lights a few years back without double checking, and when we did more research learned that we did not have the adequate amount of light necessary and we added additional lights to our set-up. So don’t be like us, and do the research ahead of time. You will want grow lights to have a certain lumen and kelvin rating. Kelvin is the most important (4500 - 6000) as this ensures plants are getting the full spectrum of light.
Q: How much Kevlin do you want for seed starting?
A: 4500-6000
2. water
Perhaps obvious but seedlings also need water, and should never dry out until established. We find it best to bottom water and let the soil soak it from the bottom up- this way the act of pouring water will not disturb the vulnerable seed or seedling. Once the water has been absorbed it is important to remove the excess water to prevent mold or mildew growth. We simply use our tap water and haven’t had any issues, but if you live in an area where you’re not sure the water quality you could consider using filtered or distilled water.
The frequency of watering will depend on your environment. We use a moisture meter to determine when the soil dries out. While the seedlings are still emerging, we maintain a moist soil level. Once the seedlings have all gotten themselves established (post true leaf formation) we will allow the soil to dry out between waterings.
3. seed starting soil
We say ‘Seed Starting Soil’ because that is what you should look for. You can typically find it at any gardening store, or even the big box stores like Home Depot or Lowes. We have used brands like Jiffy Seed Starting mix or E.B. Stone and have had success with both. These seed starting mixes are formulated to allow seedlings to thrive. It’s lightweight and fine which allows roots to easily grow. One rule of thumb, is to never start seeds with soil that has been left outdoors in the open air already (like soil from your garden). This ‘used’ soil is dangerous to new seedlings because it can harbor diseases and bacteria that could kill the fragile little plant.
Q: When should I start fertilizing my starts?
Once your seedlings have true leaves (the second set of leaves), we recommend starting to add a low dose fertilizer to your waterings. We are using Dr. Earth Pure Gold All Purpose Plant Food and fertilizing weekly. When looking for a fertilizer for your seedlings you just want to look for one that is a 1-1-1 or 2-2-2 (for NPK). This will give your seedlings a balanced amount of nutrients to grow strong.
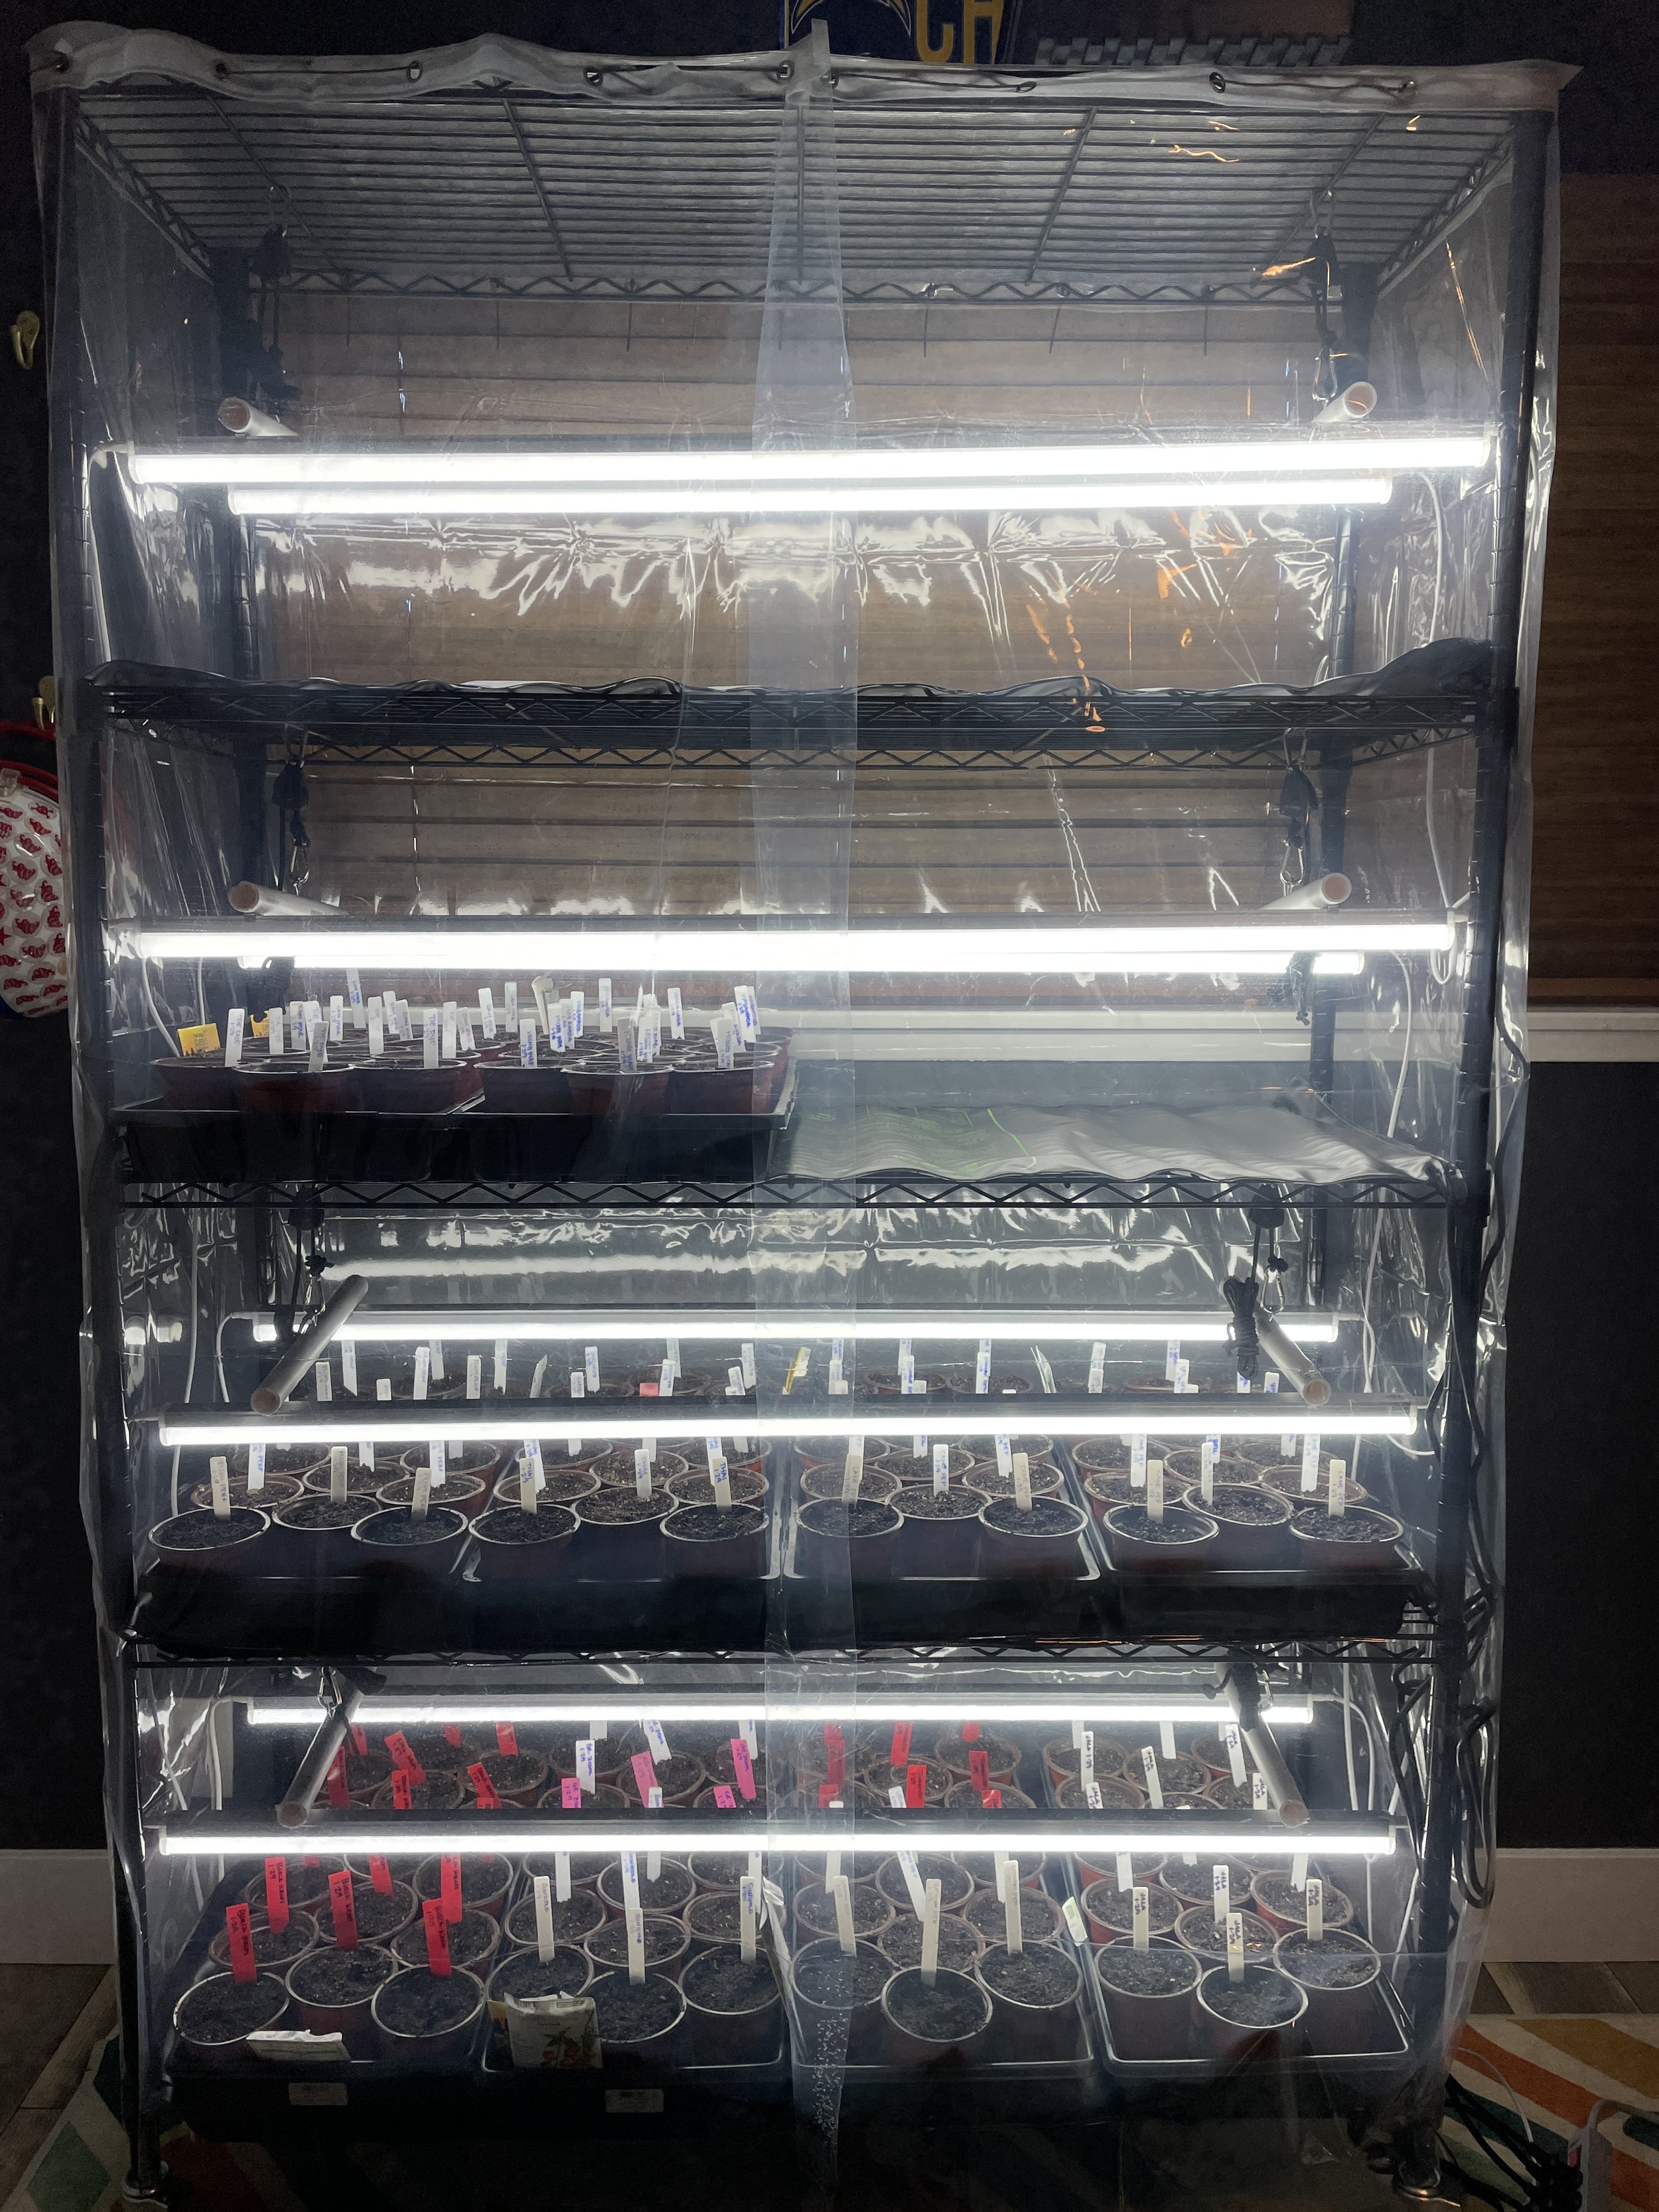
Our Seed Starting Set-Up:
We always encourage you to shop locally when able, but if you’re having a hard time finding anything, click the titles below for a link on where to get them shipped directly to you! (These are affiliate links and we greatly appreciate the support).
5 Tier Wire Shelving Unit
Why we love it: This one is 48'“ wide, 72” tall and 18” deep and fits our seed starting trays nicely.
We should be able to start up to 240 seedlings in 4” cups with this set up, and if you wanted to do smaller cells you could start even more! We bought this locally at a big box store but any wire shelving unit would work. What are we going to do with it when we are not starting seeds? Great question, but, we plan on moving it in to our garage to store the seed starting supplies as well as other gardening items. Who can complain about more storage? Am I right?
Why we love these: These grow lights are great because they fit the wire racks exactly (48”) and they meet the full spectrum lighting requirements to be successful in starting your own seeds.
They are also LED so our electrical bill shouldn’t skyrocket during seed starting season. They are 2200 Lumen and 6500 Kelvin. Why should you care about lumens and kelvin? Like we said previously, it is important to mimic the outdoor environment to the best of our ability. The higher the Kelvin rating the more full spectrum and similar to the sun the lights are. The lumen rating is important because that says how bright your lights are to ensure you are getting the most coverage. We hung two lights on each shelf to get the best coverage and prevent leggy seedlings.
NOTE: In order to hang the lights on these shelves we used PVC pipe, eye hooks & a pulley system. If you’d like to see more how how we did this, be sure to watch our YouTube video here or at the bottom of this post.

Heat Mats
Why we love these: These mats are 48” wide and 20” deep so they fit perfectly on each shelf.
We will get more than enough coverage to match our seed trays listed below. Though heat mats are not an essential piece of equipment, they will greatly improve your germination rate & speed up time to germination! There is nothing more frustrating that spending time and money and then not having success. Since we have starting using heat mats we are total believers and think they are worth the investment.
One thing to note with the heat mats is that you will want to discontinue their use once everything has germinated. If not, you may find yourself with leggy seedlings.
Timer
Why we love this: Every greenhouse setup NEEDS a timer. This allows you, the grower, to ‘set it and forget it’ sort to speak.
Simply set the timer to the recommended 16 hours of light. For example, our lights turn on at 6 am and automatically turn off and 11 pm. This way if we fall asleep early or wake up late we don’t have to worry about the seedlings not getting enough light. Plus, consistency for your little seedlings is key for their growth success!
Seed Cups
Why we love these: We like these because they are durable and won’t break if you accidentally squish them and are reusable from year to year.
We have always struggled to up-pot our seedlings and for us, it feels like time wasted. So for us, we prefer to start our seedlings right away in a 4” round pots which would skip the first round of up-potting. This allows us 4-5 weeks of growth before our first up-pot (to our 1 gallon square pots) and then directly into our garden once the temperatures allow.

Fan set-up inside the greenhouse. Most of the time is it set straight up to circulate air.
Plastic Trays
Why we love these: These trays are the perfect size for the greenhouse and can fit 4 on each rack.
These trays are very durable and reusable. They do not have holes in them to allow us to bottom water. We simply fill up the tray and after a few hours, or the next day, we use a wet shop vac to suck up any remaining water out of the trays.
Fan
Why we love this: This small fan is the perfect size to fit inside the green house, and honestly was one we had laying around the house already.
A fan is a great addition to the greenhouse seed starting set-up because it will circulate the humid air and prevent excess moisture from sitting on everything - which helps prevent mold and mildew buildup. Once the seedlings get bigger you can also use this fan to simulate wind and stimulate the seedlings to grow stronger stems.
Shower curtain
Why we love this: It helps create the ‘greenhouse’ effect by keeping humidity & warmth in side the greenhouse.
We bought two basic, clear shower curtains for our wire rack and hung from the top. The height was perfect and two curtains did the trick. We used zip ties through the grommets to secure it to the top and then strung wire we had laying around across the front to allow us to easily open the greenhouse when we were attending to the plants. If you’d like to see more on how we did this, I recommend watching our YouTube video for better clarity. To cover the top, we sourced a single 48” shelf liner to sit on the top of the wire rack. We don’t recommend placing a liner on each shelf as this would prohibit air flow.
We hope this article proved useful for you in your first starting seeds adventure or looking to upgrade a current set up. Though we do not claim to be experts, we feel we have done enough trial and errors to at least determine what not to do. Starting seedlings allows you to try new plants that you normally can’t find at the nursery - which is super fun! Comment below if you have any questions or suggestions for us to try - and don’t forget to friend us on Instagram so we can share in your seed starting endevours!
Happy planting,
Beth & Lucas